Showing posts with label Data Dictionary. Show all posts

Feb 27, 2026

SAP S4 HANA EWM Important Tables

 1. Stock

/SCWM/AQUAAvailable stock for warehouse task creation
/SCWM/QUANPhysical stock attributes
/LIME/NQUANPhysical stock
/SCWM/STOCK_IW01Normal stock
/SCWM/STOCK_IW02Batch managed stock
/SCWM/STOCK_IW03Reference stock (PDI, PDO)
/SCWM/STOCK_IW04Special stock


2. Warehouse Task

/SCWM/ORDIM_CWarehouse tasks confirmed
/SCWM/ORDIM_CSSerial number for confirmed warehouse task item
/SCWM/ORDIM_EException codes for warehouse task
/SCWM/ORDIM_HWarehouse task: Movements of HU items
/SCWM/ORDIM_HSSerial numbers for HU item movements
/SCWM/ORDIM_LWarehouse tasks log table
/SCWM/ORDIM_LSSerial numbers for warehouse task log table
/SCWM/ORDIM_OWarehouse tasks opened


3. Transportation Unit

/SCWM/TU_DLVAssignment of Deliveries and HUs to Transportation Units
/SCWM/TU_DOORRelationship between TU activities and door activities
/SCWM/TUNITData for the TU itself
/SCWM/TU_SR_ACTContains start date/times and end dates/times
/SCWM/TU_STATUSStatus of the TU activities
/SCWM/TU_VEHContains one or more vehicle activities with which a TU activity can be linked
/SCWM/DOOR_SRACTS&R Activities of a Door


4. Wave

/SCWM/WAVEHDRWave header information
/SCWM/WAVEITMWave item


5. Outbound Delivery

/SCDL/DB_DLVH_OOutbound Delivery Header
/SCDL/DB_DLVI_OOutbound Delivery Item
/SCDL/DB_PROCH_OOutbound Delivery Order Header
/SCDL/DB_PROCI_OOutbound Delivery Order Item


6. Inbound Delivery

/SCDL/DB_PROCH_IInbound Delivery Header
/SCDL/DB_PROCI_IInbound Delivery Item


7. Reference

/SCDL/DB_REFDOCReference
/SCDL/DB_REQHHeader Inbound Delivery Notification / Outbound Delivery Request
/SCDL/DB_REQIItem Inbound Delivery Notification / Outbound Delivery Request


8. Handling Unit (HU)

/SCWM/HUHDRHandling unit header
/SCWM/GMHUIDENTAdditional HU Identifications for a Goods Movement Log
/SCWM/HUSSTATIndividual status for each handling unit
/SCWM/HUREFHandling unit reference
/SCWM/HUSTOBJInformation about handling unit status object
/SCWM/GMHUSTATHU Status of HUs from Goods Movement Log
/SCWM/GMHUITMHandling Unit Item
/SCWM/GMHUHDRGoods Movement Handling Unit Header


9. Storage Bins

/SCWM/LAGPStorage Bins
/SCWM/LAGPSBins for execution areas and activities


10. Master Data

/SAPAPO/MATKEYProduct
/SAPAPO/MATMAPMapping table for products
/SAPAPO/MATEXECProduct execution data
/SAPAPO/MATTXTMaterial Descriptions
/SAPAPO/MATLWHSTLocation product for Location Warehouse and sub location storage type
/SAPAPO/MATLWHLocation product for Location Warehouse

Nov 13, 2025

SAP EWM Stock Tables


/SCWM/AQUA - Available Quantities

  • Updated at Warehouse Task creation;
  • Can be negative (it depends on your Customizing);
  • Contatins the quantity that is available for Warehouse Task creation;
  • Entry is deleted if quantity is zero.

/SCWM/QUAN - Attributes to Physical Stock

  • It has the attributes to a physical stock quantity;
  • For example: GR date, best before data, country of origin, delivery reference, etc.;
  • Entry is deleted when corresponding quantity in /LIME/NQUAN is zero.

/LIME/NQUAN - Physical Stock

  • Only needed for open Warehouse Tasks;
  • Reserve specific quantity for the Warehouse Task;
  • Entry will be set to zero when Warehouse Task is confirmed or cancelled;
  • Must NEVER be negative.

Oct 23, 2024

Steps to Create Table Maintenance in SAP FIORI


Step 1: Create an OData Service

  1. Open SEGW (Gateway Service Builder):

    • T-code: SEGW.
    • Create a new project for your table maintenance (e.g., Z_TABLE_MAINTENANCE).
  2. Create Entity Type:

    • In the Data Model section, right-click on Entity Types and choose Create.
    • Define the Entity Type based on your SAP table (e.g., MARA).
  3. Create Entity Set:

    • Right-click on Entity Sets and create an entity set that corresponds to the table (e.g., MaterialSet for MARA).
    • Map the entity type to the entity set.
  4. Generate Runtime Objects:

    • Once your data model is complete, right-click on the project and choose Generate Runtime Objects.
  5. Implement CRUD Operations in DPC_EXT:

    • Navigate to SE80 or SE24 to access the DPC_EXT class (Data Provider Class Extension).
    • Implement the CRUD methods like CREATE_ENTITY, UPDATE_ENTITY, DELETE_ENTITY, and GET_ENTITYSET to handle the operations for your SAP table.
  6. Register and Activate the OData Service:

    • Go to T-code /IWFND/MAINT_SERVICE to register and activate your OData service.
    • Test the service by accessing /sap/opu/odata/sap/<SERVICE_NAME>/ to verify that the service is working as expected.

Step 2: Create a Fiori Elements App (List Report App)

  1. Set up SAP Web IDE or Business Application Studio:

    • Open SAP Web IDE or SAP Business Application Studio (BAS) to create your app.
  2. Create a New Project:

    • From the welcome screen, select New Project from Template.
    • Choose SAP Fiori Elements – List Report Application template.
  3. Provide OData Service Information:

    • Select the system and service you created in SEGW (e.g., Z_TABLE_MAINTENANCE_SRV).
    • Select the Entity Set created for your table (e.g., MaterialSet for MARA).
  4. Configure the List Report and Object Page:

    • Define your list report settings like filters and table columns.
    • Configure the Object Page for detail views.

Step 3: Enable Editing (CRUD Operations)

  1. Edit the manifest.json:
    • Ensure that the app allows editing by setting the necessary flags in the manifest.json.
"sap.ui.generic.app": {
    "pages": {
        "ListReport|MaterialSet": {
            "entitySet": "MaterialSet",
            "component": {
                "name": "sap.suite.ui.generic.template.ListReport",
                "settings": {
                    "editable": true,
                    "defaultCreateEnabled": true,
                    "defaultDeleteEnabled": true,
                    "defaultUpdateEnabled": true
                }
            }
        },
        "ObjectPage|MaterialSet": {
            "entitySet": "MaterialSet",
            "component": {
                "name": "sap.suite.ui.generic.template.ObjectPage",
                "settings": {
                    "editableHeaderContent": true
                }
            }
        }
    }
}

  1. Configure the CDS View (if used):
    • If you are using a CDS view, ensure that you annotate the fields appropriately for editing using annotations like @UI.fieldGroup for forms and @UI.lineItem for table display.

Step 4: Deploy to SAP Fiori Launchpad

  1. Deploy the Fiori App to the ABAP Repository:

    • In SAP Web IDE or BAS, right-click on the project and select Deploy > Deploy to ABAP Repository.
    • Provide your SAP system details and select the package and transport request.
  2. Configure the Fiori Launchpad:

    • Access the Fiori Launchpad Designer using the T-code /UI2/FLPD_CUST.
    • Create a new Catalog and Group.
    • Define a new Tile for the app in the catalog.
    • Set up Target Mapping to link the tile to your deployed Fiori app by entering the Semantic Object and Action.
  3. Assign the Tile to a Role:

    • Use PFCG to create a new role or update an existing role.
    • Assign the catalog or tile to the user roles that will have access to the app.

Step 5: Assign Roles and Access in Fiori Launchpad

  1. Assign Roles to Users:
    • In PFCG, add the catalog or group to the role and assign the role to the relevant users.
    • Users assigned with the role will see the app tile in the Fiori Launchpad.

Step 6: Test and Use the App

  1. Test CRUD Operations:
    • Access the Fiori Launchpad as the user.
    • Click on the app tile and test the CRUD operations (Create, Update, Delete) for the SAP table.
    • Verify that you can maintain the SAP table's data directly from the Fiori UI.

By following these detailed steps, you will be able to create a Fiori app that allows users to maintain (Create, Update, Delete) data in an existing SAP table through the SAP Fiori Launchpad without using SE11 or SE80 directly.


Jul 5, 2023

How to activate FAGLFLEXT in SAP 4.5b version?

In the SAP 4.5b version, the FAGLFLEXT table is related to the New General Ledger Accounting (New G/L) functionality. To activate the New G/L and enable the FAGLFLEXT table, you need to follow these general steps:

  1. Perform system preparations: Ensure that your system meets the prerequisites for activating the New G/L. This includes applying any necessary SAP Notes, performing system updates, and verifying system compatibility.
  2. Activate the New G/L: Use the transaction code SFW5 to activate the New G/L in your SAP system. This transaction allows you to enable the necessary business function(s) for the New G/L. In the case of SAP 4.5b, the relevant business function might be "FIN_GL_CI_1" or a similar variant.
  3. Configure the New G/L settings: After activating the New G/L, use the transaction code SPRO to access the SAP Reference IMG (Implementation Guide). From there, navigate to the Financial Accounting section and select the New General Ledger Accounting node. Configure the settings according to your specific business requirements. This includes defining parallel ledgers, document splitting, and other New G/L functionalities.
  4. Perform data migration (if applicable): If you are transitioning from the classic General Ledger to the New G/L, you might need to perform data migration. The migration process involves transferring the existing data from the classic General Ledger to the New G/L, including the migration of line item data to the FAGLFLEXT table.


Please note that SAP 4.5b is a relatively old version, and the activation and configuration steps may vary. It is highly recommended to consult the official SAP documentation, relevant SAP Notes, or engage with experienced SAP consultants for detailed guidance specific to your SAP 4.5b system.

Jul 4, 2023

How to Download or Upload DDIC in SAP

To download or upload data elements, domains, and structures in SAP, you can follow these general steps:


Downloading Data Elements, Domains, and Structures:

  • Launch the ABAP Workbench (SE80) or the ABAP Development Tools (Eclipse-based IDE).
  • Navigate to the relevant package, where the data elements, domains, or structures are located.
  • Open the respective object type (e.g., data element, domain, or structure) from the package.
  • From the menu, choose "Utilities" and then "Download" or use the download button/icon if available.
  • Save the downloaded file to your local system.


Uploading Data Elements, Domains, and Structures:

  • Launch the ABAP Workbench (SE80) or the ABAP Development Tools (Eclipse-based IDE).
  • Navigate to the relevant package where you want to upload the data elements, domains, or structures.
  • Right-click on the package and select "Import" or use the import button/icon if available.
  • Choose the file containing the data elements, domains, or structures that you want to upload.
  • Review the import settings and make any necessary adjustments.
  • Proceed with the import process.


Note: The exact steps may vary depending on the SAP system version and the specific tools you are using for development. The provided steps are a general guideline and may require adjustments based on your system's configuration.

Additionally, it's important to have the necessary authorization and appropriate access rights to perform these activities in your SAP system. If you encounter any issues or have specific questions, it's recommended to consult with your SAP administrator or technical consultant for guidance.


Sep 19, 2018

Function Module DDUT_TEXTTABLE_GET to Determine Text Table for a Table of ABAP Dictionary

Determine Text Table for a Table of ABAP Dictionary

Functionality
This function module defines the name of the text table for a table defined in the ABAP Dictionary.

Pass the name of the table for which you want the text table in parameter TABNAME. If this table does not exist in the ABAP Dictionary or if it does not have a text table, the EXPORT parameters are empty. Otherwise the name of the text table is returned in export parameter TEXTTABLE. The name of the field from this text table that is used as check field for the text foreign key relationship is returned in export parameter CHECKFIELD.

Notes
If the name of the text table is known, your definition can be read with one of the function modules
DDIF_TABL_GET, DDIF_FIELDINFO_GET or DDIF_NAMETAB_GET as needed.

Parameters
TABNAME
TEXTTABLE
CHECKFIELD


Related posts:


Jun 10, 2018

Auto Update Fields in Table Maintenance Generator

Requirement:

In SM30 for table ZMMT_NIE, when there is an input, field username, current date, and time must be automatically filled. In order to do that, certain enhancement must be created.


Solution:
1. Check tab Delivery and Maintenance > Data browser/table view editing must be 'X' = 'Display Maintenance Allowed'.


2. Select Utilities > Table Maintenence Generator


This will take you to Maintenance screen.


3. Environment > Modification > Events


4. Create form routines:
  • ZBEFORE_SAVING. Type  '01' (will be called before saving)
  • ZNEW_ENTRY. Type '05' (Every new entry creation)

5. Click on the Editor button and you can create the routine to update the fields.


Result:


Related posts:

Jan 21, 2018

Append Fix Value in SAP Standard Domain

Requirement:

In transaction VB22, Release Status currently only has value: A, B, and C.
Another value Z will be added.


Solution:

Open the domain of Release Status (KFRST)

Click menu: Goto > Fixed Value Append

Create Fixed Value name. e.g.: ZFV_KFRST

Append value Z

Value Z added

Result:


Related posts:

Dec 15, 2014

Create Search Help in ABAP for Web Dynpro Component

This ABAP tutorial shows how to create search help and use it in Web Dynpro component for a context node attribute. First developers create Search Help in ABAP Data Dictionary using SE80 then assign Search Help to context node attribute using Input Help Mode and Dictionary Search Help properties in SAP Web Dynpro component.

This ABAP tutorial is formed of two sub-headings. First part in this tutorial shows how ABAP developers can create a search help in ABAP DATA Dictionary. The second section of the tutorial is dealing with how Web Dynpro developers can use this search help for a context node attribute.


Create Search Help in Data Dictionary

Call transaction SE80 Object Navigator. In Transport Organizer tab select Package from drop down list. Find your target package where you want to create your search help data dictionary object.


Right click on Dictionary Objects Context menu Create > Search Help


Type Search Help name. Leave Elementary search help as selected option.


Search Help create screen to define a new one


Type a short description. On Definition tab, type the master lookup table name at Selection method input textbox. Click on the first empty parameter line Search help parameter cell. Press F4 for possible entries or click on the F4 icon displayed when you click on the cell.


Double click on the field name you want to export to input text which is dislaying this search help. Mark the search help parameter as export.

Add all other desired fields but mark this time as import parameters

Enter the position number you want to see the field values in hit list using the LPos entery field. If you try to activate Search Help without hit list, you will get an error preventing the successfull activation of Search Help data dictionary object. Position in the hit list of an elementary search help Position of the parameter in the hit list.
Save and activate

Use Search Help in Web Dynpro Component for a Context Field

If you are going to use this Search Help on a Web Dynpro component, open component controller. Go to Context tab. Drill down the context node until you find the target field. Open properties of the attribute. There is a dropdown box at Input Help Mode property. You will see Dictionary Search Help. Change it from Automatic which is default to Dictionary Search Help.


Then enter the name of the Search Help data dictionary object which we have created in previous steps into the "Dictionary Search Help" property.


Save and activate your web dynpro component.
Here is the Search Help in action on a Web Dynpro web page.

Sep 30, 2014

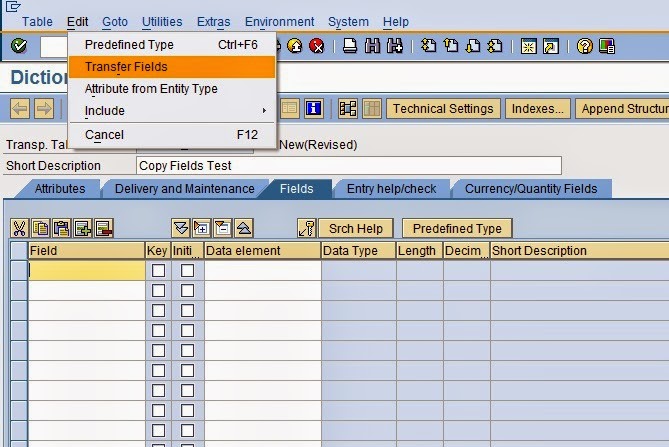
Copying Fields from other Structures or Tables


1.  Create table / structure name. As an example below is table name


2.  Choose from menu: Edit -> Transfer Fields


3.  Input structure name and press ‘Selection’.

4.  Select the fields and press Copy


5.  Paste the fields from Cipboard:


6.  All fields copied:


Jan 25, 2014

Display data dynamically using Field Symbols

1.     Introduction: - Displaying the table contents dynamically as per table name mentioned on selection screen with help of field symbols.  If user enters MARA, then the data from MARA table is retrieved. If VBAK, then VBAK data is shown.  

2.     Steps:- 
Declare two parameter variables as below:-
Create a field symbol as below:-
Initially check whether table exists or not.
If table exists in database then by using create data statement create the data object and assign the reference to data object of w_dref reference variable.
Now assign the reference variable to field symbol as below:
In runtime after assign statement the <t_itab> structure will be same as table name entered on selection screen.
Now select the data from database and put it in field-symbol (dynamic internal table).
Now create the field catalog by using the function module .
Display the data by using function module  as below:-
  
Example:-
Give table name as mara on selection screen and no of records as 100 and press F8. 
List is displayed as below:
Now give table name as VBAK and press F8.

3.     Summary:-
The importance of this tutorial is to display the data as per table name mentioned on selection screen by user with Field symbols concept.
a)     First declare the two parameters one for table name and other for no of records to be displayed.
b)    Declare the field symbol of type standard table.
c)     Check table name given on selection screen exists or not.
d)    Create the internal table at runtime and select the data from table and place it in dynamic internal table (Field symbol).
e)     Create the field catalog and display the data.  
4.     Source Code:-
REPORT y_saptechnical_dynamic NO STANDARD PAGE HEADING.
*"Type-pool............................................................
TYPE-POOLS : slis.*"Parameters elements..................................................
PARAMETERS : p_table TYPE tabname OBLIGATORY,       " Table Name
             p_no    
TYPE i .                       " No of Records to be displayed

DATA:
  w_dref    
TYPE REF TO data,          " w_dref reference variable
  t_line    
TYPE c LENGTH 20.          " w_line to hold a line
DATA :
  t_fcat  
TYPE slis_t_fieldcat_alv.

FIELD-SYMBOLS: <t_itab> 
TYPE STANDARD TABLE.

START-OF-SELECTION.
  
SELECT SINGLE
         tabname                       
" Table Name
    
FROM dd02l
    
INTO t_line
   
WHERE tabname   EQ p_table
     
AND as4vers   EQ ' '
     
AND as4local  EQ 'A'
     
AND tabclass  NE 'INTTAB'
     
AND tabclass  NE 'APPEND'.

  
IF sy-subrc EQ 0.
    
CREATE DATA w_dref TYPE STANDARD TABLE OF (p_table).
    
ASSIGN w_dref->* TO <t_itab>.
    
IF sy-subrc EQ 0.
      
SELECT *                         " All Fields
        
FROM (p_table)
        
INTO TABLE <t_itab> UP TO p_no ROWS.

      
IF sy-subrc EQ 0.
        
PERFORM fill_catalog.
        
PERFORM display.
      ELSE.
        
MESSAGE text-002 TYPE 'S'.
        EXIT.
      ENDIF.                           
" IF sy-subrc EQ 0...
    ELSE.
      
MESSAGE text-003 TYPE 'S'.
      EXIT.
    ENDIF.
  ELSE.
    
MESSAGE text-003 TYPE 'S'.
    
LEAVE LIST-PROCESSING.
  ENDIF.                               
" IF sy-subrc EQ 0...
FORM display .
  
CALL FUNCTION 'REUSE_ALV_GRID_DISPLAY'
    
EXPORTING
      it_fieldcat   = t_fcat
    
TABLES
      t_outtab      = <t_itab>
    
EXCEPTIONS
      program_error = 
1
      
OTHERS        = 2.
  
IF sy-subrc <> 0.
    
MESSAGE ID sy-msgid TYPE 'S' NUMBER sy-msgno DISPLAY LIKE 'E'
            
WITH sy-msgv1 sy-msgv2 sy-msgv3 sy-msgv4.
    EXIT.
  ENDIF.                               
" IF sy-subrc <> 0...
ENDFORM.                               
" DISPLAY
FORM fill_catalog .
  
CALL FUNCTION 'REUSE_ALV_FIELDCATALOG_MERGE'
    
EXPORTING
      i_program_name         = sy-repid
      i_structure_name       = p_table
    
CHANGING
      ct_fieldcat            = t_fcat
    
EXCEPTIONS
      inconsistent_interface = 
1
      program_error          = 
2
      
OTHERS                 = 3.
  
IF sy-subrc <> 0.
    
MESSAGE ID sy-msgid TYPE 'S' NUMBER sy-msgno DISPLAY LIKE 'E'
            
WITH sy-msgv1 sy-msgv2 sy-msgv3 sy-msgv4.
    EXIT.
  ENDIF.                               
" IF sy-subrc <> 0...
ENDFORM.                               
" FILL_CATALOG


Source:
http://saptechnical.com/Tutorials/ABAP/FS/Index.htm
by Vineesh Batchu, Yash Technologies